In this post through a couple others that would follow, we’re going to be building our own Facebook (oh yeah!). Brace yourself. It’s going to be one hell of an exciting ride!
All parts
- Build a Facebook clone from scratch with PHP — Part 1 (this article)
- Build a Facebook clone from scratch with PHP — Part 2
- Build a Facebook clone from scratch with PHP — Part 3
- Build a Facebook clone from scratch with PHP — Part 4
- Build a Facebook clone from scratch with PHP — Part 5
- Build a Facebook clone from scratch with PHP — Part 6
- Build a Facebook clone from scratch with PHP — Part 7
We’re making Facebook? Wow!
Facebook is the largest social network platform in the world. I mean, it’s crazy! An application that serves ~2 billion people? Insane! Facebook over the years has become more and more complex, adding new and exciting features as the days go by.
I’d like to, at this rather early juncture, outline what we’ll be building.
Facebook is big. There are photos, groups, messaging, pages, videos, live videos, stories, VR and more. That’s a lot. What we’ll be building here is good ol’ Facebook of 2004 — probably less. We want to focus on the initial core features of Facebook — posts, profiles, timelines, friend relationships and login/registration. Awesome!
Is it for me?
If you have at least a basic understanding of programming concepts and front end web development (i.e HTML, CSS, Javascript) this series is for you. If you have little/zero knowledge of front end web development, you can check out this post I wrote: HTML, CSS and Javascript as fast as possible. If it doesn’t help, you’ll need to pick up some more elaborate course/tutorial to get up to speed. It’s vital you have some general knowledge of computer programming though to get the best from the series.
What you’ll be needing
All you’ll be needing is a PC/Mac and 3 apps you can download for free online:
- VS Code (text editor)
- XAMPP (PHP interpreter, PHP development server and MySQL server)
- Filezilla (FTP client)
VS Code is a flexible light-weight text editor. We’ll be using it to write our code.
XAMPP (pronounced “zamp”) is a suite of tools that’ll help us develop FaceClone (yeah, that’s the name of the Facebook clone we’ll be building). XAMPP is an acronym that stands for Cross-Platform (X), Apache (A), MariaDB (M), PHP (P) and Perl (P). We’ll be using the PHP interpreter, the PHP development server and MySQL from XAMPP. You can read more about XAMPP here.
Filezilla is an FTP client. FTP stands for File Transfer Protocol. We’ll be deploying our Facebook clone app. Filezilla is going to enable us upload our code to an online server.
NB: If you have issues setting up any of these apps, please let me know in the comments. I’m ready to help where I can.
The HTML template
I built a HTML template for the project. I figured it’ll be better to focus on PHP and MySQL than HTML, CSS and Javascript. Besides, using a ready-made template would enable us work faster which is what we want, right? Here’s the repo for the template: https://github.com/nicholaskajoh/faceclone-html-template. Click on the green “clone or download” button, then “download ZIP” to get the template. Unzip it to any location of your choice.
Let’s quickly observe the structure of the template folder:
 Folder structure for the template (ignore the .git folder)
The folder structure should be similar to the screenshot above. The .gitignore and README.md files are repo files and are not needed here so we can delete them.
The css folder contain css files for styling our web app. There are several “bootstrap” files and a style.css file. Bootstrap is a HTML, CSS and Javascript framework that helps us built beautiful and responsive UIs quickly. I used Bootstrap for the template. In the style.css file, I specified a couple of styles to customize Bootstrap.
The fonts folder contains the gyphicons fonts which Bootstrap uses for its icons.
The js folder contains javascript files as you would expect. There’s bootstrap.js, bootstrap.min.js and npm.js from Bootstrap and script.js where we can define custom javascript code.
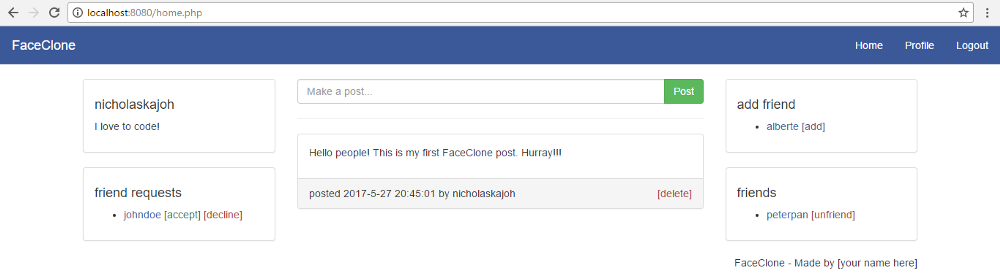
There are 3 main html files: home.html, index.html and profile.html. The names of these files suggest what they contain. Go ahead and open these files with a browser. The index file contains a login and register form where our users can “login or register”. The home page contains a logged-in user’s feed as well as a couple other things and the profile page contains information about a user. The template.html file is an empty template file. You can use it to build other page templates if you want to add another other feature to your version of FaceClone!
Try opening these template files in VS Code to see the code. Compare the code with what you see in the browser and try to make sense of it. Don’t fret if you don’t understand any or all of it. We’re going to do justice to the code in later parts.
Serving our template
With XAMPP installed, we have access to PHP’s development server from a terminal. Browsers can interpret/run HTML, CSS and Javascript code. They however cannot run PHP code. PHP is a server-side language. This means it runs on a server. When a request is made to the server by a browser (e.g when you try to visit www.facebook.com), PHP executes and produces HTML code which is returned by the server to the browser.
Open up a terminal window in the root folder of the project (i.e the folder displayed in the screenshot above). You can Google how to open up a terminal in your OS if you don’t know how to. Type the following and hit enter:
php -v
You should get a result similar to the screenshot below (i.e the version of PHP you have installed):
 A terminal window
If you get a weird message like “invalid command” or something, your XAMPP is probably not properly installed. Post a comment on this article if you have any issues installing any of the apps we’ll be using.
Now type in php -S localhost:8080 and hit enter. This command starts up the PHP development server on port 8080. Visit http://localhost:8080 on your browser. Our FaceClone template is opened up!
Unlike when we clicked index.html or the other html files to open them up in our browser, the page that is displayed was “served” by a server. This means we can run PHP code in them. Great!
But we actually can’t! Not yet. We have to change those files from html to php so that our server knows that they contain PHP and must be “pre-processed” before they are served. So go ahead and change home.html to home.php and so on for the other html files. Now we should have a folder structure similar to this:
 Your folder structure should look like this (ignore the .gitkeep file)
That’s all for part 1. Cool!!!
The final code for this part is contained in my FaceClone repo here: https://github.com/nicholaskajoh/faceclone. Visit the link and click on the part-1 folder to see progress made so far.
Next: Build a Facebook clone from scratch with PHP — Part 2.
Last modified on 2023-03-14