All parts
- Build a Facebook clone from scratch with PHP — Part 1
- Build a Facebook clone from scratch with PHP — Part 2
- Build a Facebook clone from scratch with PHP — Part 3
- Build a Facebook clone from scratch with PHP — Part 4
- Build a Facebook clone from scratch with PHP — Part 5 (this article)
- Build a Facebook clone from scratch with PHP — Part 6
- Build a Facebook clone from scratch with PHP — Part 7
Every Facebook user has a profile. Let’s create profile pages for FaceClone users!
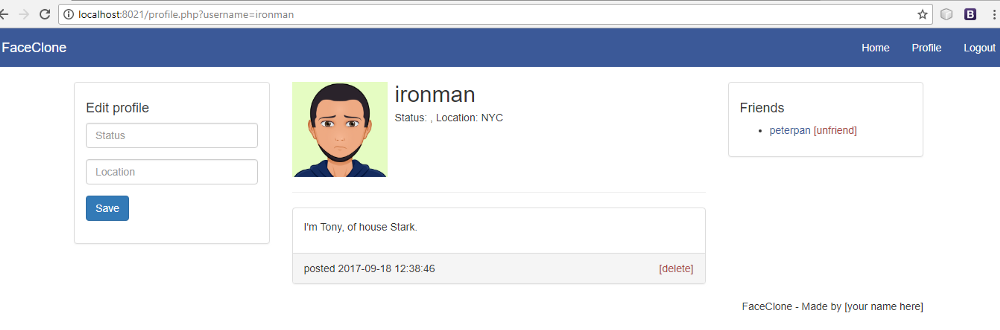 FaceClone profile page
But before I forget…
Recall that we used id of zero for the user_id fields in our posts table. That was because we didn’t have any users. Now that we do, let’s change things a bit. The query in create-post.php becomes…
...
$sql = "INSERT INTO posts (content, user_id) VALUES (?, ?)";
...
$statement->bind_param('si', $_POST['content'], $_SESSION['user_id']);
...
We simply change the user_id value to the user_id session which is created when a user logs in.
NB: Since registration now works in our application, you may delete the dummy user accounts and use the registration form for account/user creation.
So…
Isn’t there just one profile page (i.e profile.php)? How do we create profile pages for “all” our users? Well, we can make profile.php dynamic like we did with home.php. In essence, we would have one page, but different data depending on a given user. There are many ways to achieve this. Our approach in this part is simple though. We simply provide a user’s username as a parameter in the profile url and use it (the username) to pull the user’s data from the DB. E.g example.com/profile.php?username=nicholas.
Since the username is sent through a GET request, we can retrieve it with the $_GET superglobal using $_GET['username']. Let’s write some code:
Atop profile.php…
...
$sql = "SELECT id, username, status, profile_image_url, location FROM users WHERE username = ?";
$statement = $conn->prepare($sql);
$statement->bind_param('s', $_GET['username']);
$statement->execute();
$statement->store_result();
$statement->bind_result($id, $username, $status, $profile_image_url, $location);
$statement->fetch();
...
First, we get the username, then run a query to fetch a user using their username and that’s just about it. $id, $username, $status, $profile_image_url and $location variables can now be echoed out where we need them in the page.
User posts
Then again, we want to show only the posts belonging to the user whose profile is being displayed. Taking a cue from the home page which displays the posts of all users across FaceClone (part 3), we can create a new sql query:
$user_posts_sql = "SELECT * FROM posts WHERE user_id = {$id} ORDER BY created_at DESC";
In the query above, we use the where clause to limit the posts to the ones belonging to the profile owner. $id is the user’s id got from the query to fetch a user’s record.
Edit profile
Lastly, we need to allow users to make changes to their profiles. There’s a little form in profile.php we can use to update status and location. Let’s make it work! The form…
...
<form method="post" action="php/edit-profile.php">
<div class="form-group">
    <input class="form-control" type="text" name="status" placeholder="Status" value="">
</div>
<div class="form-group">
    <input class="form-control" type="text" name="location" placeholder="Location" value="">
</div>
<div class="form-group">
    <input class="btn btn-primary" type="submit" value="Save">
</div>
</form>
...
Now create a file in the php folder called edit-profile.php with the following code:
<?php
    require_once "../functions.php";
    db_connect();
    $sql = "UPDATE users SET status = ?, location = ? WHERE id = ?";
    $statement = $conn->prepare($sql);
    $statement->bind_param('ssi', $_POST['status'], $_POST['location'], $_SESSION['user_id']);
    if ($statement->execute()) {
        redirect_to("/profile.php?username={$_SESSION['user_username']}");
    } else {
        echo "Error: " . $conn->error;
    }
You’re probably used to the above snippet by now. We update the status and location of a user using the UPDATE sql statement then redirect back to profile.php. Sweet!
*drops mic*
The final code for this part is contained in my FaceClone repo. Visit the link and click on the part-5 folder to see progress made so far.
Next: Build a Facebook clone from scratch with PHP — Part 6.
Previous: Build a Facebook clone from scratch with PHP — Part 4.
Last modified on 2023-03-14